
In this lesson, you will learn how to make your first HTML webpage using a few lines of code.
HTML stands for Hypertext Markup Language.
“Hello World” Webpage
Now, we’ll make our first HTML webpage in the following steps on computer, but you can also do this on a smartphone using a text editor and web browser:
Step 1: Open a text editor like Notepad or Wordpad as follows:
1. Click on the start button on Windows on your computer.
2. Click on Windows Accessories. Then you will find Wordpad.
3. Click on it. This will open Wordpad.
![]()
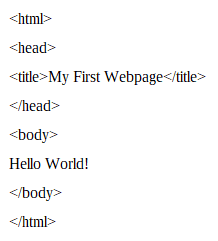
Step 2: Write the following in the empty Wordpad:
Step 3: Click the save button and save your file with the “.html” extension. Then, click “Save”.
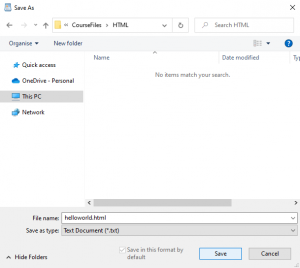
Step 4: You will get the message that says, “You are about to save the document in a Text-only format, which will remove all formatting. Are you sure that you want to do this? To save in another format, click No.”
Click “Yes”.
Go to the location of the file and double-click it to open it in web browser. You will see the following webpage:
![]()
All HTML files begin with the HTML starting tag and end with the HTML ending tag.
![]()
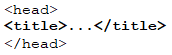
Also, all <>s end with </>s. We put the title tags between the head tags.
After the head tag closing, we put the body tags and inside the body tags, we put our text, images, and more.
![]()